Friday, November 26, 2010

Zombie Love!

Holy Shit! It seems like it's been years since I've posted anything.Well, I'm back from the dead and I've brought a few Zombies along with me.

A while back I remade the Zombies in my Undead Mordheim Warband. I was never really happy with the Zombies from the boxed set. The heads were too large and the arms were too bulky. I decided to keep the torsos and legs from the boxed set, but I replaced the heads and arms. I took the arms from the Undead Crypt Ghouls, and the heads came from the cart pullers on the Corpse Cart.

Below are comparison images of the old zombies versus the new.


Friday, July 23, 2010

Executioner's Hood

In our current campaign I found the Executioner's Hood. Such a bad-ass magical item demanded modeling, so I made one that is removable. I gave it to my Dreg.

Tuesday, June 29, 2010

Hired Zombie Ogre

In my current campaign I just hired an Ogre. My previous hired Ogre was just a slightly modified Mordheim Ogre. I gave him two hand axes an a different stance. My new Ogre is made from one of the new plastic Bull Ogres. I decided to model him as a Zombie to fit the theme of my undead warband.

Saturday, June 19, 2010

First New Zombie

Okay. I finally finished my first new Zombie. I'm working on three others at the moment. They're intended to replace the current Zombies. I may try running an eight Zombie warband some day too though.


Here you can see the difference between the new Zombie and it's old equivalent.


Thursday, June 17, 2010

Orcs & Zombies?

The Orcs are on hold for a bit while I improve my greenstuff skills. A guy I met at my local shop does some amazing GS work and he's agreed to let me study his techniques. So, I'm holding off on the Orcs until then.

On the upside, my down time has allowed me to start painting my new Zombies. I'm about done with the first one. Post to follow shortly.

Thursday, June 10, 2010

Orcs & Goblins Warband

I love the new plastic Orcs so much that I decided to take a break from my Possessed and begin building an Orc warband. I'll be posting pictures of my GS work soon.
I'm also running a campaign at my local shop next week, in which I'll be running my Orcs so they should be done soon.

Monday, April 26, 2010

Hideous Mutants


These two Possessed Mutants were made from my favorite GW sprues, the Crypt Ghouls and Corpse Cart. The bodies are modified Ghouls and the heads are from the pile of bodies on the Corpse Cart.
I modified the Ghoul bodies to look like human hunchbacks, by first removing the spines/hairs on the back and the crotch. Next I smoothed out the regions with very fine sand paper. I then modeled a loin cloth with a Flagellant chain as the belt. I sanded one side of the chain down so that it would lay nicely on the models's hips. I wanted it to look as though is was digging into his muscle tissue. The next modification was the addition of a weapon to the Ghoul hand. I chose Ghoul arms that were either making a fist or holding something, then clipped and drilled a holes for the Flagellant clubs. The last conversion was the head. Most of the bodies on the corpse cart have hair and I knew I wanted these guys to be flayed, so I had to clip the hair off and smooth the dome of the skull.
It's a pretty simple conversion really.

Hideous Mutant: Eye-Gore


This mutant is my favorite of the two. He's a little larger and I really like his pose.
The paint job is very similar to the first mutant I posted below. I had some trouble matching the colors exactly, but eventually it worked out. The only part I'm still unhappy with is the weapon. I spent a lot of time painting the wood on the shaft of the mace but my blood effects obscured that detail.
For tips on painting the musculature see the first mutant.

Hideous Mutant: Froderick


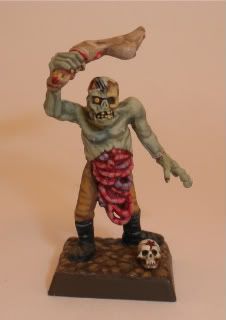
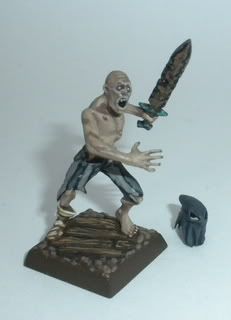
I had a lot of fun painting this mutant. I used two sources for inspiration, Cybersquig's blood letter on cmon and my friend's human anatomy book. The blood letter was used for color scale and the book was a good guide for the musculature.

Painting the skinless musculature:
Base: dark red, purple 2:1
Dry Brush: dark red, purple, hot pink 2:1:1
Wash: dark red, black, wash agent 2:1:5
Dry fully

I do this so that I can see where the features on the model naturally stand out with paint. Then I know where to focus my layers.

Layer 1: dark red, purple, hot pink 2:1:0.5
Layer 2: dark red, purple, hot pink 2:1:1
Layer 3: dark red, hot pink 2:1
Layer 4: dark red, hot pink 1:1
Layer 5: dark red, hot pink, linen white 2:1:1
Layer 6: dark red, linen white 1:1
Sharpen with dark red

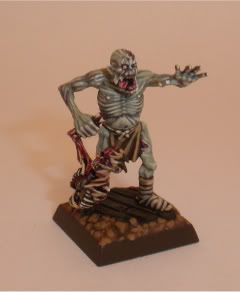
The ligaments above the bone structure:
Layer 1: sand yellow, brown 1:1
Layer 2: sand yellow
Layer 3: bone
Layer 4: linen white
Layer 5: white

Veins:
Layer 1: blue, purple 2:1
Layer 2: blue, purple, ghostly white 2:1:1
Wash: purple, blue, wash agent 2:1:5


Vampire & War-Bat

This model underwent several changes before the final version. I've tried 3 different arms and a few heads. Below are a few pictures of that progression, followed by the final product.


The final components are as follows:
-Winged Vampire Body; The wing, head and shoulder spikes have been removed.
-Mannfred Von Cartstein Head
-Crypt Ghoul Arm.


The Bat was simply taken fron the Winged Vampire and mounted on it's own base. The base was also easy to make. I just laid green stuff over it and then pressed a wood grain mold and a gravel mold into the putty. The molds were made by pressing the wood grain of a coffin lid into some Super Sculpy and baking it to harden. The gravel mold was made in the same manner.

Necromancer


The Necromancer was taken from the Corpse Cart boxed set and set on it's own base. I took the book under his foot from Flagellant's sprue and the sword is from the Skeleton Warrior's sprue.


Warlock & Witch


The Warlock has only one conversion. I removed the dagger from his right hand to achieve a casting pose.


My Witch actually has many more conversions than are immediately obvious. First, I sanded off any embellishments on the robes. Next, I cut out the staff which went from his left hand through his cloak. I then applied Ghoul arms and green stuff cloak sleeves. The head is an Empire Wizard head, but the hair has been removed and sanded down.

Dregs


These models are not available from GW in their current form. They are a hodgepodge of body parts from the Corpse Cart sprue. The torsos are from the Cart Pullers, as are the short sword and axe arms. The heads, legs and arms are from the Cart's Body Pile. However the arms on the center Dreg are from the Crypt Ghoul sprue. The Two-Handed Sword is from the Empire Wizard sprue. I had to tap many holes in it to make it look as weathered as the other weapons in the group. Some parts of the pants and legs were sculpted with green stuff. The joints such as the neck, shoulders and knees were all made from green stuff as well.

Ghouls


There are no conversions here, but I love these models. Best creepy arms in the line.


I'll describe the steps in my list of layers:

1) Ghoul Skin(Reaper) & Camo Green(Game Color) 1:1
The first layer is the undercoat. If this isn't dark enough I might add a little chocolate brown to the mix=> 3:3:1

2) Chocolate Brown Wash(Reaper) 1:7
Next, I wash the skin in Chocolate Brown. The wash will pool in the recesses and clearly define the raised areas that I will be focusing on in the next step.

3) Moldy Skin(Reaper) & Camo 1:1
Wait for the wash to dry completely. I can't stress that part enough. Then apply the Moldy skin mix to the raised areas of the model. Cover as much of the raised areas as possible. If you accidentally get some paint in a recess the just pool a little wash in that spot and let it dry.

After the Moldy Skin layer I like to wash the scars and bruises. I make 2 separate washes on Red/Ruddy Brown(Reaper) 3:1 and the other Purple(Reaper). Both washes are 1:7 Paint:Water. First, I let the red wash pool around the scars and boils. I let that dry, then I add just a little purple to one end of the scars. If the scars intersect I apply it there as well. I also pool a little purple wash around the eyes.

4) Bloodless Skin(Reaper) & Camo 2:1
After all the washes have dried I hit the raised areas again with the next highlight. Make sure to leave parts of the last highlight visible as you go. This is also a great time to clean up any overspill from the scar and bruise washes.

5) Bloodless Skin
This is the last highlight. I only apply it to the highest raised areas. As I do this I make stripes across the last highlight to shade the color. I also apply it to the edges of the scars.

The back spines and hairs are done in a similar manner using Chocolate Brown and Leather brown.

1) Chocolate
2) Chocolate & Leather 1:1
3) Leather

The bases are made from green stuff. I just made a mold of a wooden plank from the corpse cart and another mold of piled rocks, then pressed then on the GS on my bases until it looked like a plank of wood on a pile of dirt.

Zombies


The Zombies have little conversion work. I ground down the shoulders and arms so they wouldn't have that 80's shoulder pad look. I also chopped off and replaced their weapon hands with hands from the Undead Totem on the same sprue. I wanted my warband to be 'What You See Is What You Get." and in Mordheim, the Zombies don't carry weapons, just limbs.